In this article, we'll get a small web application online from start to finish.
We'll install the required tools, buy and configure a domain, set up a GitHub repository and continuous delivery through GitHub Actions.
If you'd rather avoid purchasing a domain, you can use a domain ending in .xmit.dev. Most of this guide still applies.
Prerequisites
-
A working installation of Node and npm. One might appreciate dedicated managers like fnm; otherwise, to keep things simple:
-
On Mac, install
brewif you haven't already, thenbrew install node. -
On Linux, use your package manager.
-
On Windows, download from nodejs.org.
-
-
A code editor like Visual Studio Code.
-
A domain purchased through the registrar of your choice. We'll use namecheap in this guide as we do whenever viable, and will rely on their name servers too.
Create the project
In a terminal, let's run npm create vite@latest, choose hello as the project name, React as our framework, and TypeScript as our language.
$ npm create vite@latest
Need to install the following packages:
  create-vite@5.2.3
Ok to proceed? (y)
✔ Project name: … hello
✔ Select a framework: › React
✔ Select a variant: › TypeScript

Scaffolding project in /Users/demo/hello...

Done. Now run:

  cd hello
  npm install
  npm run dev
Set up a Git repository
In the terminal, go into the project, run git init, git add ., git commit -m "Initial commit":
$ cd hello
$ git init
Initialized empty Git repository in /Users/demo/hello/.git/
$ git add .
$ git commit -m 'Initial commit'
[main (root-commit) 90094cf] Initial commit
 15 files changed, 314 insertions(+)
 create mode 100644 .eslintrc.cjs
 create mode 100644 .gitignore
 create mode 100644 README.md
 create mode 100644 index.html
 create mode 100644 package.json
 create mode 100644 public/vite.svg
 create mode 100644 src/App.css
 create mode 100644 src/App.tsx
 create mode 100644 src/assets/react.svg
 create mode 100644 src/index.css
 create mode 100644 src/main.tsx
 create mode 100644 src/vite-env.d.ts
 create mode 100644 tsconfig.json
 create mode 100644 tsconfig.node.json
 create mode 100644 vite.config.ts
Set up a GitHub repository
Head to GitHub's repository creation, name your repository hello, hit "Create repository". Note that we recommend creating the repository in a team rather than your personal account; create one for free.
Then, in the terminal, follow GitHub's instructions to push an existing repository from the command line:
$ git remote add origin git@github.com:xmitdemo/hello.git
$ git branch -M main
$ git push -u origin main
Enumerating objects: 20, done.
Counting objects: 100% (20/20), done.
Delta compression using up to 8 threads
Compressing objects: 100% (17/17), done.
Writing objects: 100% (20/20), 7.45 KiB | 3.72 MiB/s, done.
Total 20 (delta 0), reused 0 (delta 0), pack-reused 0 (from 0)
To github.com:xmitdemo/hello.git
 * [new branch]      main -> main
branch 'main' set up to track 'origin/main' by rebasing.
Create an xmit team
Having logged into our account on xmit, we click + new team; a team #33: unnamed appears, which we ✎ rename to demo team.
Buy and configure a domain
After purchasing a domain, head to namecheap's domain list and click "Manage" on the domain you want to use, then select Advanced DNS.
We provision hello.pcarrier.com; xmit requires that we also provision www.hello.pcarrier.com. It would be simpler to use a wildcard DNS record, but that's more invasive and this guide is designed to help you try things first.
We click Add new record twice. In both cases, we pick CNAME Record as the type, and 33.xmit.co. as the target to match our team number; for the first record, we set the host to hello, and for the second to www.hello.

Local deployment
We add a dependency on xmit to our project from the terminal:
$ npm install @xmit.co/xmit --save-dev
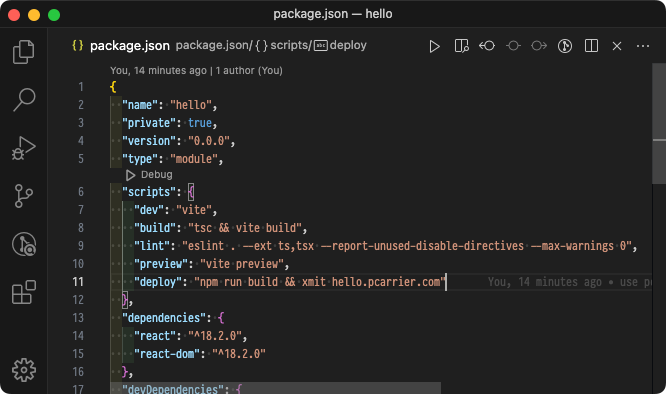
We open package.json in the editor to add a deploy script that runs xmit hello.pcarrier.com after the build script:
We're almost ready! xmit needs an API key to deploy. User API keys are better on development machines, and team API keys in CI/CD.
We head to the the admin page, where we click + create in the API keys section of our user, then 📋 copy after a ✎ rename to laptop.
To use the key, we run npm install then npx xmit set-key, where we paste the key then press Enter:
$ npm install
…
$ npx xmit set-key
🔑 Enter your key (no echo):
Now everything should be ready on our machine! Run npm run deploy to build the project and deploy it to the web:
$ npm run deploy

> hello@0.0.0 deploy
> npm run build && xmit hello.pcarrier.com


> hello@0.0.0 build
> tsc && vite build

vite v5.2.9 building for production...
✓ 34 modules transformed.
dist/index.html                   0.46 kB │ gzip:  0.30 kB
dist/assets/react-CHdo91hT.svg    4.13 kB │ gzip:  2.14 kB
dist/assets/index-DiwrgTda.css    1.39 kB │ gzip:  0.72 kB
dist/assets/index-MJNRYYyu.js   143.39 kB │ gzip: 46.11 kB
✓ built in 388ms
2024/04/17 01:04:15 📦 Bundling /Users/demo/src/hello/dist…
2024/04/17 01:04:15 🎁 Bundled 5 files (150870 bytes)
2024/04/17 01:04:15 🤔 Suggesting bundle…
2024/04/17 01:04:15 🚶 Uploading bundle (323 bytes)…
Upload progress: 323/323 (100%)
2024/04/17 01:04:16 🏃 Uploading 5 missing parts (49037 bytes)…
Upload progress: 49037/49037 (100%)
2024/04/17 01:04:17 🏁 Finalizing…
2024/04/17 01:04:17 🚀 Launch #1 complete, visible at https://hello.pcarrier.com
and a #17: hello.pcarrier.com site appears instantly in the Sites section of team #33: demo team.
Set up continuous delivery
On xmit's admin page, we + create an API key for the team, ✎ rename it to Actions for hello, and 📋 copy it.
On GitHub, we head to the Settings tab of the repository, Secrets and variable, Actions, and click New repository secret. We name the secret XMIT_KEY and paste the key as the value.
In the editor, we create a .github/workflows/deploy.yaml file with the following content:
on:
  push:
    branches: [main]

# Allow one concurrent deployment
concurrency:
  group: deploy
  cancel-in-progress: true

jobs:
  deploy:
    runs-on: ubuntu-latest
    steps:
      - name: Checkout
        uses: actions/checkout@v4
      - name: Set up Node
        uses: actions/setup-node@v4
        with:
          node-version: 20
          cache: "npm"
      - name: Install dependencies
        run: npm ci
      - name: Deploy
        run: npm run deploy
        env:
          XMIT_KEY: ${{ secrets.XMIT_KEY }}
From the terminal, we add our changes to the repository (package.json, package-lock.json, .github/workflows/deploy.yaml), commit, and push:
$ git add .
$ git commit -m 'deploy workflow'
…
$ git push
…
To github.com:xmitdemo/hello.git
 + a9db365...0c48227 main -> main
On GitHub, in the Actions tab, we click on the workflow run, deploy job, Deploy step, where we should see a log entry like:
2024/04/16 23:22:13 💤 Already latest launch (#1)
Test continuous delivery
In src/App.tsx, we change <h1>Vite + React</h1> to <h1>Vite + React + xmit</h1>, run git commit -am 'Title change', and git push. After a minute or so, the change is live!
SPA routing, JS and CSS caching
In public, we create xmit.toml with:
fallback = "index.html"

[[headers]]
name = "cache-control"
value = "public, max-age=31536000"
on = "/assets/.*"
and keep hacking!